- Â
å Monday, February 27th, 2017
( Where to find and buy Parallels, Windows
In order to install Windows on your Mac, you will need to purchase and download Parallels (unless we have spoken to you and recommended using bootcamp, are already using bootcamp or are using a PC). You can purchase Parallels and download the free Student edition of Windows from https://risd.onthehub.com . Be sure to give yourself plenty of time for downloading and installing as the files are quite large. If you have downloaded your free copy of Windows 10 previously while at RISD, you will not see an option to get Windows as they only allow you to download the OS once. Check the bottom of this post for more information.
Once you download the Windows 10 ISO (the installer file) and Parallels, install Parallels first. It will then guide you through installing a virtual machine (where you will run Windows). You will need the ISO file on your computer or a USB thumb drive and your License key but the install should be fairly automated with Parallels.

You will find Windows under the “Microsoft” tab and Parallels under “More Software” tab.
 You should buy the Parallels Desktop 12 for Mac, not the version with the “access bundle”.
 This is what you should see for windows once you add it to your cart. If you can’t find it, read below:
Can’t Find Windows on onthehub?
If you previously installed or downloaded Windows 10 from onthehub, you will need to find the email that contains your license key that was sent when you originally. If you don’t have this you’ll need to talk to OIT to retrieve it or pay for a new license. You can get the ISO file (the disk image of the installer) from OIT, another student or we will try to have Marylin have a USB drive you can check out with the file.
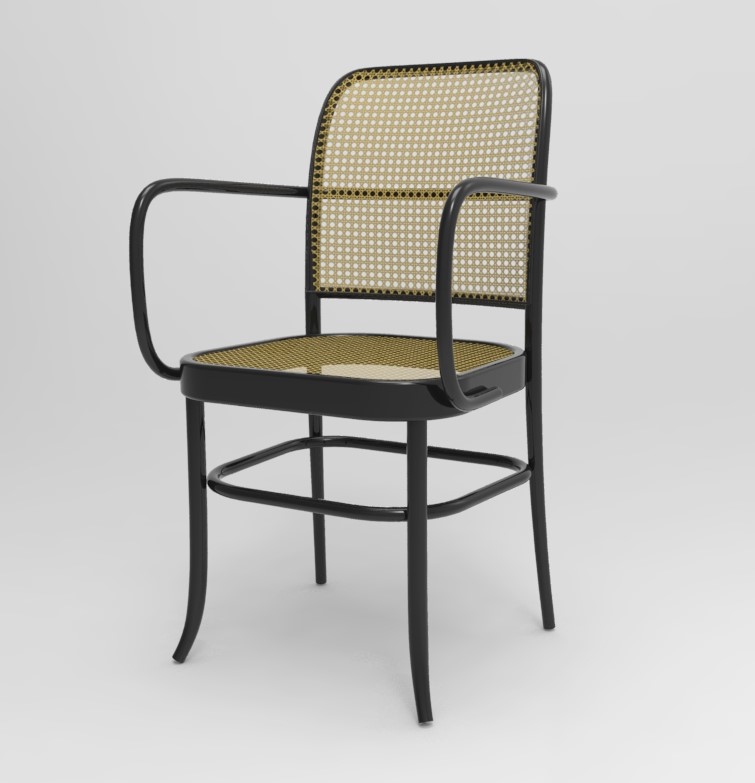
B Chair Cane and Wood Texture
Here are two images that can be used to simulate a caned surface as was demonstrated in class.

![]()
A basic review of how to do this:
- Assign the objects you want to have this texture with a “Matte Paint” material with any color (other materials will work as well, but this is a good start)
- Find this material in the list of in-use materials from the materials inspector, double click on it
- Click on the “Textures” Tab
- Assign the black and tan image to the “Color” texture option
- Assign the black and white image to the “Opacity” texture option
- Make sure the option for “sync” is turned on from the bottom of the textures properties
- Adjust the scale as needed with the slider or by entering a number in the field associated with the scale slider
And here is a wood texture you can use
![]()
í Assignment 2
1. Comment on Someone else’s project
A. Due March 3
In response to their work on the drinking glasses part of Assignment 1, write a very brief statement commenting on the work of the classmate whose last name follows your alphabetically (the last person in this order should comment on the first person). Describe at least one positive and one negative aspect of their design, but also make specific suggestions for how their rendering can be improved. This comment is required, you are also welcome and encouraged to comment on anyone’s work. Use Google Doc’s commenting feature to do this.
2. Improve Your Post for Assignment 1
Due March 6
If your post from the first assignment had any problems, or if suggestions were made that could improve your design or rendering, you have the chance to go back and make improvements. Technically this is not required, but the improved submission will be considered for grading purposes, should you choose to revise. If you choose to improve your work, modify your document, adding the new content so we can see the improvements in relation to the original content. Don’t delete the original work.
3. Chair Study: Models and Rendering.
Due March 6
Working from the brief for the Chair Study project, you should create the following content:
Rhino File
- Build a model of each chair.
- Begin by drawing 3D curves that faithfully capture the proportions and scale of the chairs.
- Most of the bentwood components should be built with the pipe tool, with the majority of remaining surfaces built as extrusions or surfaces from planar curves (“planarsrf” command).
- Build all chairs in a single Rhino file.
- Place each chair on its own set of layers
- Use nesting layers to place each part of the chair on a separate layer
- Build each chair to have a consistent relationship with the origin (if one is centered over the origin, make all of them centered, for example)
- Keep all important curves on layers to facilitate organization and management
Rendering
- Using Keyshot, create a single rendering of all three chairs composed and arranged into a photographic scene in order to create an interesting image.
- Save your rendering in JPG format. The image you post should be 800 pixels wide.
Don’t worry about the drawing aspect of this project – that will come next week.
Put your rendering in your personal google drive folder and the “chair rendering folder”. Name this file “Firstname_Lastname_Chair”.
4. Install Windows
Instructions for obtaining Windows and Parallels will be covered in a separate post, but you should download and install the virtualization software (parallels) and Windows.
5. Paper Model Selections
Select and bring in several objects for consideration to use in the next project, Paper Model.
í Week 2 Challenge Part 3: Lego Figure
Using this Rhino File, assemble the Lego figure in the poses indicated this document.
Keep the original model, and make a new layer (or set of layers) for each pose.

í Week 2 Challenge Part 2: Drawing in 3D
Fit a control point curve in the tubes included in this model. Use the exact number of points indicated by the layer name.
í Week 2 Challenge Part 1: Tracing
Use the image below to trace the figures shown in red. Each figure indicates the drawing tool you should use and two of them have specific instructions about the number of points your drawing should have.
Y If you haven’t completed the Hardware survey, please do so
Here’s a link to the survey. This information will be helpful for us as we start working with Windows in the next few weeks.
-
Classroom
-
