- Â
5 Setup
( Watch Videos Faster (or slower)
The recent videos I posted are not sped up like some of the others I have posted are. You can get a browser extension that will let you speed up (or slow down) the videos as you like.
Chrome:
Playback speed for embedded vimeo
Playback Rate
FireFox:
Faster Video
I’m sure there are similar options for Safari, but I can’t seem to find a free one.
( Default Settings in MasterCAM (updated)
This video shows how to configure default settings in MasterCAM. This makes it so you don’t need to choose settings each time you work on a new project.
Here are the recommended settings for the toolpaths we have covered so far. Keep in mind that some of the settings will need to change depending on the needs of the project, the material you are cutting and the tool being used.
( Mastercam Display issues in Parallels
As many of you found firsthand in class, sometimes running MasterCAM in Parallels will end up having display issues, specifically when moving the model around in the viewport it will ghost. After testing we discovered this problem occurs when you switch the display mode of Parallels (fullscreen to windowed mode or vice-versa), or sometimes when you adjust the window size. It seems that switching to Coherence Mode will resolve or prevent this bug from occurring. To do this Parallels has several interfaces where you can choose the menu item View>Enter Coherence, or use press: command-control-C

Coherence eliminates the Windows operating system and makes MasterCAM or any other Windows application or file browser appear like a Mac app. This can make finding files through the windows desktop tricky; you can either exit Coherence mode and minimize the MasterCAM window or click on the Windows 10 icon in the Mac Dock to open the start menu and find your files through the window that opens there. We’re not sure if this will completely eliminate this issue but so far it seems to have; if you run into this issue and this fix doesn’t work, or you encounter any others, please let us know.
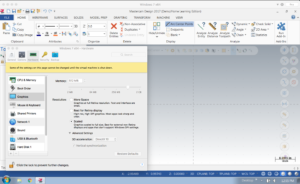
( Adjusting the resolution of Parallels for Retina Displays
I sent an email with this information but I’ll post here as well.
I wanted to share some information regarding running windows via parallels, particularly to mac users with Retina screen (high resolution) Apple laptops. The mastercam interface will probably appear less than ideal using Parallel’s default setting (if you have a retina display), particularly the menus and interface. You can adjust the way parallels displays windows if you open the configure window from the top menu (see image 1). Under the Graphics option you can change the Resolution to Scaled which will work better with Mastercam. If you are running into issues with mastercam operating in windows on Parallels please let Chris and I know and we’ll try to help.

( Updated Tool Library with Plywood Bit
Hello All, as I mentioned yesterday in the demo, we’ll be using a specific bit for our plywood furniture assignment after Spring Break in this class. I’m attaching a link to that tool library here for you to download. The file is zipped so you’ll need to open the zip archive and then copy the file (BANK_TOOLS_2015+PlywoodBit.TOOLDB) to your Windows Installation and load it as was shown in the demo. Have a great Spring Break!
https://drive.google.com/file/d/0B8d3cMG0eaxfVnVZUWVKMG9iN1U/view?usp=sharing
( Use the Middle Mouse Button for Increased Productivity!!!!!
In both the Windows and Mac versions of Rhino you can customize the pop-up menu that appears when you click on the middle mouse button. You’ll see me do this often when I’m working in Rhino – it’s a huge productivity booster.
To customize in Windows:
Click the middle mouse button
click on the small gray bar at the top of the menu – this will “dock” the menu
remove items from the menu by holding shift as you drag them off the menu and into the workspace
add items by holding CTRL as you drag from an existing toolbar into the menu
To customize on the Mac:
http://discourse.mcneel.com/t/cant-customize-middle-mouse-button-popup-toolbar/4044
( Commenting in Google Docs
Part of the homework is to comment on someone else’s project. There are several ways to do this, but all start with opening the google doc you want to comment on (duh):
- select the text you wish to comment on
- go to Insert>Comment (you can also use the shortcut command+alt+M on mac and ctrl+alt+M on mac)
- type your comment into the field that appears
- click on the comment button
or
- float the cursor along the right edge of the page near the section you want to comment on until an icon of a talk bubble with a document in it
- click on this button
- type your comment into the field that appears
- click on the comment button
As reminder, you are supposed to comment on the person whose last name is after your’s alphabetically. The last person in the order should comment on the first person. Here is a list of the class’s last name:
- Bartlett
- Brame
- Buttaci – Rincon
- Cassell
- Caycedo
- Cha
- Chen
- Cottingham
- Dekhayser
- Ford
- Gong
- Gupta
- Jaramillo
- Librizzi
- Mandel
- May
- McAllister
- Miller
- Ng
- Pratt
- Ralls
- Reina
- Shaw-Jones
- Suryanarayanan
- Walworth
- Wang
- Wei
- Zhang
- Zhu
( Where to find and buy Parallels, Windows
In order to install Windows on your Mac, you will need to purchase and download Parallels (unless we have spoken to you and recommended using bootcamp, are already using bootcamp or are using a PC). You can purchase Parallels and download the free Student edition of Windows from https://risd.onthehub.com . Be sure to give yourself plenty of time for downloading and installing as the files are quite large. If you have downloaded your free copy of Windows 10 previously while at RISD, you will not see an option to get Windows as they only allow you to download the OS once. Check the bottom of this post for more information.
Once you download the Windows 10 ISO (the installer file) and Parallels, install Parallels first. It will then guide you through installing a virtual machine (where you will run Windows). You will need the ISO file on your computer or a USB thumb drive and your License key but the install should be fairly automated with Parallels.

You will find Windows under the “Microsoft” tab and Parallels under “More Software” tab.
 You should buy the Parallels Desktop 12 for Mac, not the version with the “access bundle”.
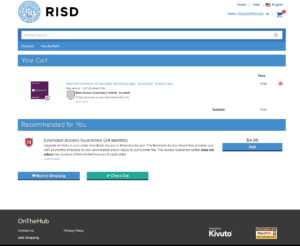 This is what you should see for windows once you add it to your cart. If you can’t find it, read below:
Can’t Find Windows on onthehub?
If you previously installed or downloaded Windows 10 from onthehub, you will need to find the email that contains your license key that was sent when you originally. If you don’t have this you’ll need to talk to OIT to retrieve it or pay for a new license. You can get the ISO file (the disk image of the installer) from OIT, another student or we will try to have Marylin have a USB drive you can check out with the file.
( Apple Magic Mouse + Rhino
If you have the Apple Magic Mouse and are using it with Rhino, you might find there are some things about it that are not ideal. There are a couple of tricks that might improve the behavior the mouse that you can try setting up.
If the virtual “scroll” is too fast, go to Rhino > Preferences > View > Zoom, and change to Scale factor value to a value closer to 1 to slow down the zooming speed.
You can also try the third party mouse control application called Magic Prefs that allows you to make more detailed adjustments to the mouse settings than the System Preferences panel allows.
( Where to get Rhino and Keyshot
Rhino will be available from the RISD store on Thursday (they’re sold out but a new shipment is on the way). It’s in one of the locked cases in the back, so you will need to ask for it. But be sure to get the right OS. With a student ID, it should be $80. Regular student licenses are more expensive ($195), so don’t get it anywhere else but from the RISD store.
Here’s a link to where you can purchase the educational license of Keyshot:
https://buy.keyshot.com/products/keyshot-hd-animation-education-version
You will need to supply proof of educational status, and they approve the purchase during business hours (M-F, 9am -6pm PST) so you’ll need to keep that in mind.
On Windows you can get a plugin for Rhino that lets you work between Keyshot and Rhino a little bit more easily. Get it here:
https://www.keyshot.com/downloads/plugins/
In the meantime, you can use the trial version:
https://www.keyshot.com/try/
( Making Mac Rhino Look More Like Windows Rhino
Many of the videos we post are recorded on a Windows computer. Some of you might prefer your setup to look more like the Windows version of Rhino. Here’s how Rhino approaches this:
“By default, Rhino for Mac presumes you are not coming from Rhino for Windows. If you would like to see Windows-esque toolbars, navigate to Rhinoceros > Preferences > Themes and select Rhino for Windows. You will need to start a new modeling window for these changes to take effect.”
See more about the interface differences between Mac and Windows here:
-
Classroom
-
