- Â
B Reference
B Recommended Settings for MasterCAM
I’ve created a PDF that has recommended settings for the contour, drill, and pocket toolpaths. You will see that things are different for the Drill operation. You should choose the “circle mill” option for the toolpath type for the drill operation. This option works better than the “peck drill” operation we used previously. You should also keep in mind that some settings are variable, such as depth, and might not necessarily need the settings indicated in the document. See the PDF below for details.
B Step Stool MasterCAM and Rhino files
You can download the Rhino and MasterCAM files of the small step stool we have looked at in class. They are both contained in the zip folder below
https://3d2017.christopherspecce.com/wp-content/uploads/2017/04/StepStoolExample.zip

B Switching viewports?
Hannah asked today: “Is there a keystroke to switch between viewports?”
Yes, there is:
- Windows: CTRL+Tab
- Mac: Command +Tab
You can also toggle maximizing the active viewport by pressing CTRL (windows) or Command (Mac) + M

B Another explanation of surface continuity
This page has a perhaps more entertaining way to discuss surface continuity, but it also covers higher orders of continuity – G3 and G4.
https://www.augi.com/articles/detail/an-introduction-to-surface-continuity
B More about NURBS
If you’re curious to learn more about NURBS, I’m sharing a couple of links that go more in depth on how this geometry works.
This article links to a somewhat comprehensive definition of NURBS
http://www.rhino3d.com/nurbs
This article links to two other that are more deep in their description, with equations and formulas that are quite complex:
http://www.mactech.com/articles/develop/issue_25/schneider.html
http://web.cs.wpi.edu/~matt/courses/cs563/talks/nurbs.html
The Wikipedia page for NURBS is also a useful reference:
https://en.wikipedia.org/wiki/Non-uniform_rational_B-spline
B Content from the Demo in the CNC Lab
Here is some of the content that was introduced in the CNC lab, but in slide form.
B Cat Face Tutorial
Follow along to the Cat Face Tutorial here:
https://risdbankcnc.squarespace.com/introduction/
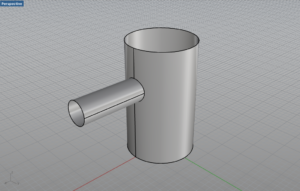
B Useful SrfSeam Command
One tool we want to ensure everyone knows about is the SrfSeam command which could be very important on the paper model project.. This tool allows you to move the seam of a surface, for instance where the wrapped surface of a cylinder meets. This command won’t work on polysurfaces so you will have to explode or extract the surface you’d like to adjust. Attached are a few images of using the command to move the seam of a cylinder away from where another cylinder is bisecting it. Moving the seam will affect how the Unroll developable surface creates the pattern.


B Strange Looking Glass Rendering?
Does your rendering look like this:

This is happening because there are two surfaces occupying the same space. One that is using a glass material, the other is using the dark liquid material. The software tries to display both of them, but an interference pattern results. You will need to select the object with the glass material and turn it off. you can do this in Rhino, but if you are already in Keyshot, you can do it there as well. There are two ways to do this:
This page shows how to use the scene tree to select an object and turn it off
https://www.keyshot.com/manual/keyshot6/?section=scene-tree
But you can also delete it. From the scene tree, select the object you want to delete and then right click and select delete from the list of options (shown here):
https://www.keyshot.com/manual/keyshot6/?section=duplicating-models
In Rhino, you can also run the command SelDupAll (Edit>Select>Duplicate Objects) to find any duplicates that might be in your model.
This link provides an illustrated explanation. It’s geared towards SolidWorks users, but the concept is the same.
B Unroll Surface Video Demonstration
This video provides an in depth review of the “Unroll” command
You can download the model used in this video here:
https://3d2017.christopherspecce.com/wp-content/uploads/2017/03/UnrollVideoDemoModel.zip
B Video Review of Make2D
If you’re looking for a review of the Make2D command that was covered in class, here’s a video that provides a quick refresher. FYI – this video isn’t mine – it’s from Polyplane.com
B Extrusions Aren’t Solid!?
In an email Hannah asked:
I have drawn and extruded it different ways a billion times but it wont create a solid extrusion like it will for the circular seats. The two extrusions always have space between them even though solid is checked off in the extrusion menu. I’ve tried to join the two extrusions and make a surface to go between them, and make surfaces before extruding, but nothing has worked. Do you have any idea of what isn’t working?
- Select one of the curves
- select the properties inspector on the right side of the rhino window – the one with two concentric circles on mac, a rainbow wheel on windows
- expand the “details” drop down on mac, on windows, click on the “details” button
- look to see if it says the curve / polycurve is “open” or “closed”
- repeat for the other curve
B “History” functionality in Rhino
We didn’t look at this in class, but the “History” functionality in Rhino could be very useful as you are work on building the three bentwood chairs. This functionality will link input and output geometry. In other words, it can connect a curve (input geometry) with a pipe (output geometry) so that if the input curve is manipulated, the resulting output surface will follow this change.
More information here:
http://docs.mcneel.com/rhino/5/help/en-us/commands/history.htm
B Chair Cane and Wood Texture
Here are two images that can be used to simulate a caned surface as was demonstrated in class.

![]()
A basic review of how to do this:
- Assign the objects you want to have this texture with a “Matte Paint” material with any color (other materials will work as well, but this is a good start)
- Find this material in the list of in-use materials from the materials inspector, double click on it
- Click on the “Textures” Tab
- Assign the black and tan image to the “Color” texture option
- Assign the black and white image to the “Opacity” texture option
- Make sure the option for “sync” is turned on from the bottom of the textures properties
- Adjust the scale as needed with the slider or by entering a number in the field associated with the scale slider
And here is a wood texture you can use
![]()
B Navigating the view of your workspace
By now I am hopeful that you all understand the basics of navigating the view of your model with the various functions we discussed in class.
Zoom (remember, zooming focuses on the cursor position)
- CTRL (windows) or Command (mac) + hold right click and drag forward (in) and backward (out)
- scroll wheel up and down
- pinch on trackpad (mac). You should use a mouse though.
Pan
- shift + hold right click and drag
- two finger drag on trackpad. Again, use a mouse.
Rotate (aka tumble, orbit)
- hold right click and drag
- two finger hold click and drag on trackpad. But of course, you will be using a mouse
Sometimes when you are viewing your model, you can get lost. This can happen if you zoom in or out to far or your rotate away from your object. When this happens, you can Zoom the “Extents” of your workspace. This means that the “camera” will reposition to display all of the objects contained in your workspace. To do this you can:
- click on the “ZoomExtents” button from the toolbar (looks like a magnifying glass surrounded by four triangles
- from the drop down menu select View>Zoom>Zoom Extents
- Type the command Zoom”, then pick the option “Extents”
Another thing that sometimes happen is you either can’t zoom in, or out any further than you are, or when you rotate the view, your object doesn’t stay centered in the viewport. This happens when the “focus” of the “camera” is not where you want it to be. A useful command to remedy this is Zoom Target. This allows you to select a point to recenter the focus of the camera. To do this you can:
- click on the “Zoom Target” button from the toolbar (it is the right click function of the “Zoom” button, which looks like a magnifying glass that is partially over a square drawn with dotted lines
- from the drop down menu select View>Zoom>Zoom Target
- type the command “Zoom”, then pick the option “Target”
Once the command is running you will be prompted to select a new target. Click where you want your target to be placed, then you can draw a rectangle to establish the extents of the view.
B A review of Rhino’s interface and Geometry Types
If you need a refresher, here is a review of the Rhino interface.
And here is a review of the various kinds of geometry you can work with in Rhino.
B How to make a screenshot
The drinking glass assignment requires that you take a screen shot of your revolve curves. Here’s how to do this:
Windows and mac:
Make sure the viewport you want to capture is active, then run the command – ViewCaptureToFile.
Also FYI:
the Mac OS has an easy to use screen capture tool built in. Press Shift+Command+4 and a cursor will appear that allows you drag an area to capture as a screen shot. You should hear a shutter sound, this means that the image is saved to your desktop.
Windows has a built in app called “Snipping Tool” that can be used for screen shots.
B More information on the “PictureFrame” command
If you’ve seen Part 1 of the Drinking Glasses Demo videos, then you’ve gotten a taste of what the PictureFrame command can do. This is a great tool and I use it all of the time if I need to bring in an image to use as an underlay for tracing, modeling, reverse engineering, etc, etc. Here is a more in-depth look at how it works.
B Drinking Glass Demo Part 3: Rendering with Keyshot
Part 3: This Video demonstrates how to do a basic rendering with Keyshot, including how to set up the kinds of materials you may want to use for this project.
B Drinking Glass Demo Part 2: Volume Analysis
Part 2: How to measure the volume of your glass.
Commands used in this video:
- box
- booleansplit
- volume
B Drinking Glass Demo Part 1: Drawing and Revolving
Part 1: A review of the drawing and modeling techniques required to complete the drinking glass assignment.
Commands used in this video:
- Pictureframe
- Curve (control point curve)
- fillet
- BlendCRV
- Scale1D
- join
- explode
- revolve (full circle)
B How to use the trim, split, join, explode, and cap commands
An introduction to several useful editing commands in Rhino.
The commands covered in this video are:
Trim
Split
Join
Explode
Cap
Fillet (with radius set to a value of 0)
-
Classroom
-
